As I sift through my collection of beloved desserts, I can’t help but feel a thrill when I come across Tiramisu Truffles. These delightful no-bake morsels capture the essence of the classic Italian dessert without all the fuss. Rich and creamy, with layers of bold coffee flavor, they’re a genuine treat that makes you feel like you’re indulging in something lavish, yet whip up in a breeze. These truffles not only elevate any gathering but also offer the perfect way to slow down and savor life’s little moments. Plus, they’re vegetarian and easily customizable for various taste preferences. Who can resist that? Are you ready to roll up your sleeves and discover how to create these luxurious bites of joy?

Why Are Tiramisu Truffles So Irresistible?
Indulgent, creamy layers: Tiramisu Truffles deliver all the rich flavors of traditional tiramisu without the need for baking. Simplicity at its best: With no baking required, these treats are quick to make, perfect for anyone short on time. Endless variations: Customize your truffles with flavors like hazelnut liqueur or a chocolate coating for a unique twist. Impressive crowd-pleaser: They’re ideal for gatherings, providing a touch of elegance everyone will love. Dive into these decadent bites and explore more delightful options like Pumpkin Tiramisu Fall for seasonal flair!
Tiramisu Truffles Ingredients
Here’s everything you need to whip up these delightful treats!
For the Filling
- Mascarpone Cheese – Provides a creamy, rich base with a luxurious mouthfeel; use high-quality Italian mascarpone for authenticity.
- Cream Cheese – Adds tanginess and helps achieve the desired texture; substitute with full-fat cream cheese for a similar outcome.
- Powdered Sugar – Sweetens the filling and ensures a smooth consistency; no specific substitution needed.
- Vanilla Extract – Enhances flavor profile with a sweet aroma; pure extract is preferred for better taste.
- Instant Espresso Powder – Delivers authentic coffee flavor without brewing; can be adjusted based on taste preference.
- Ladyfinger Crumbs – Adds a traditional tiramisu flavor and texture; graham crackers can substitute in a pinch, but they alter the texture.
Optional Add-ins
- Dark Chocolate Shavings – Introduces an additional layer of chocolate richness; substitute with finely grated chocolate if desired.
- Coffee Liqueur or Rum Extract – Adds an extra layer of flavor; use in moderation to maintain consistency.
For the Coating
- Unsweetened Cocoa Powder – Dusts the truffles, giving them a classic finish; ensure high-quality cocoa for the best flavor.
Step‑by‑Step Instructions for Tiramisu Truffles
Step 1: Prepare the Creamy Filling
In a large bowl, beat together 8 ounces of mascarpone cheese and 4 ounces of softened cream cheese using an electric mixer on medium speed until smooth and fluffy, about 2-3 minutes. The mixture should be creamy without any lumps. This forms the luxurious base needed for your Tiramisu Truffles, ensuring a rich flavor.
Step 2: Mix the Flavor Components
Add ½ cup of powdered sugar, 1 teaspoon of vanilla extract, and 2 tablespoons of instant espresso powder to the cream mixture. Continue mixing until all ingredients are well incorporated and the mixture is smooth, approximately 1-2 minutes. You’ll notice a lovely aroma from the espresso, signaling the bold coffee flavor that’s characteristic of tiramisu.
Step 3: Fold in the Crumbs
Gently fold in 1 cup of ladyfinger crumbs and optionally, 2 tablespoons of dark chocolate shavings using a spatula. Be careful not to overmix, as you want to maintain the airy texture of the filling. This step brings the traditional tiramisu flavor and adds a delightful chocolate nuance to your truffles.
Step 4: Chill the Mixture
Once the filling is well combined, cover the bowl with plastic wrap and refrigerate for at least 1 hour. This chilling period is crucial as it helps the mixture firm up, making it easier to shape into truffles later. The filling should be firm yet pliable when you’re ready to scoop, allowing for smooth rolling.
Step 5: Shape the Truffles
With damp hands to prevent sticking, scoop out portions of the chilled mixture, about 1 inch in diameter, and roll them into smooth balls. This process should take around 15-20 minutes, resulting in beautifully formed Tiramisu Truffles that capture that indulgent creamy texture.
Step 6: Dust with Cocoa Powder
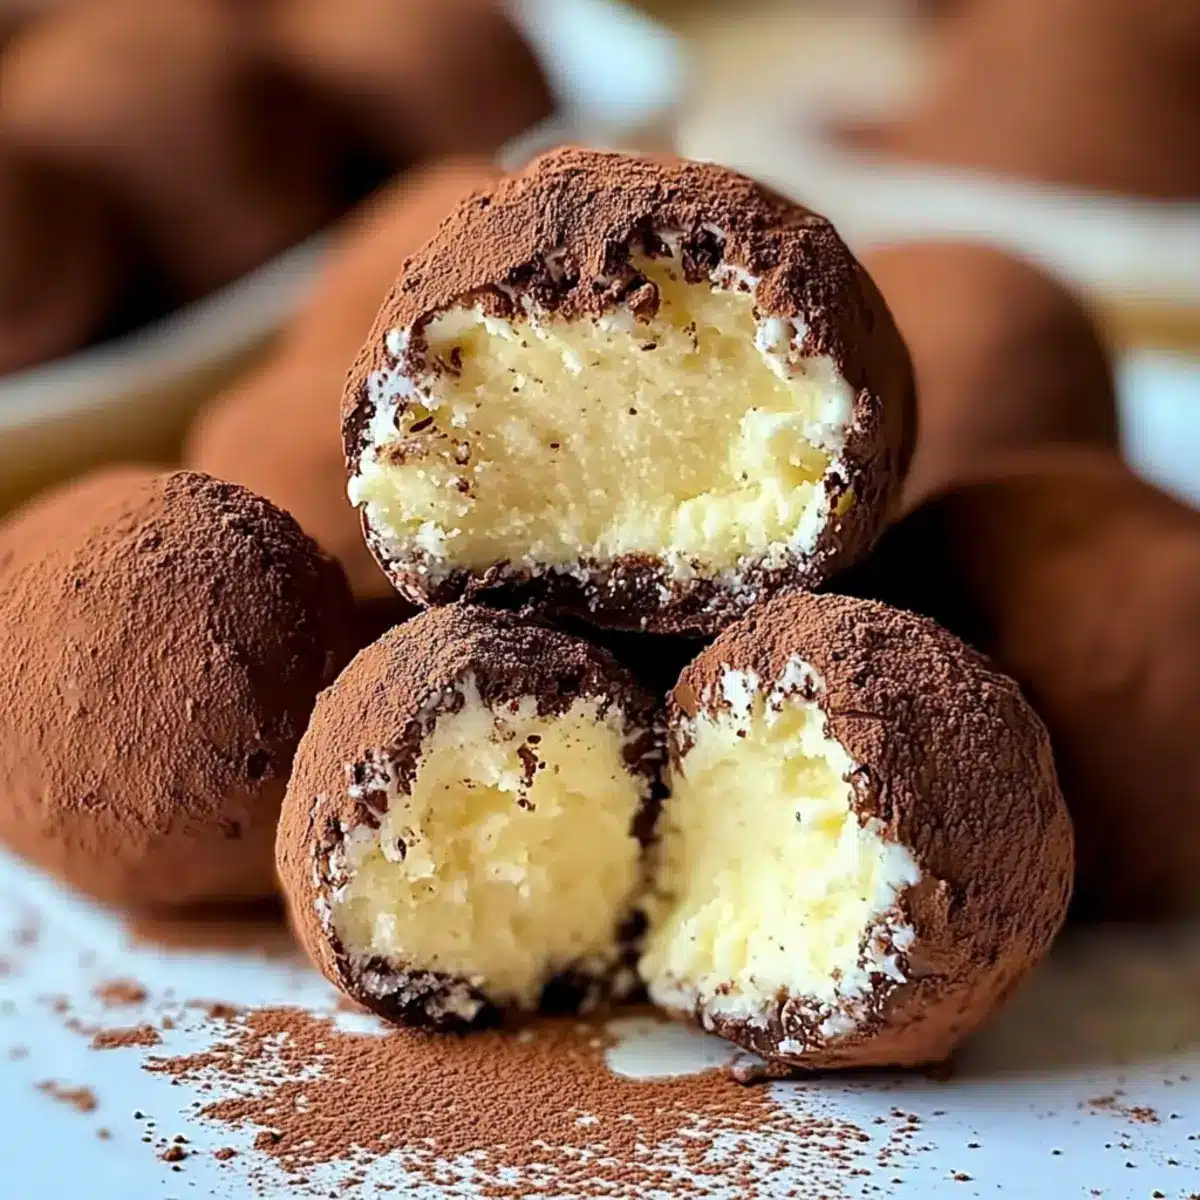
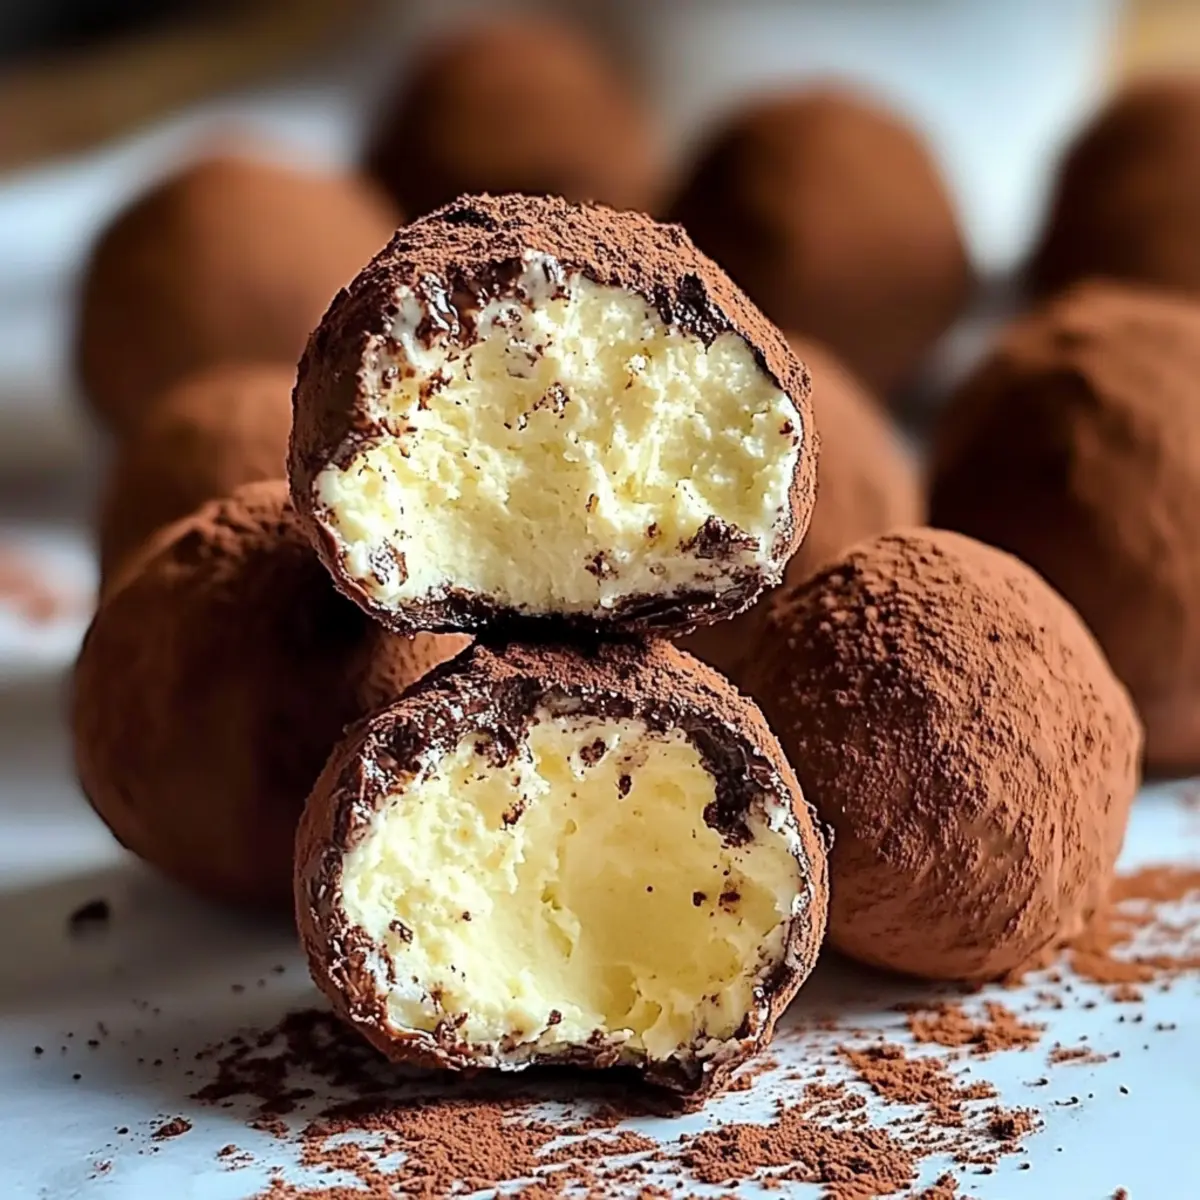
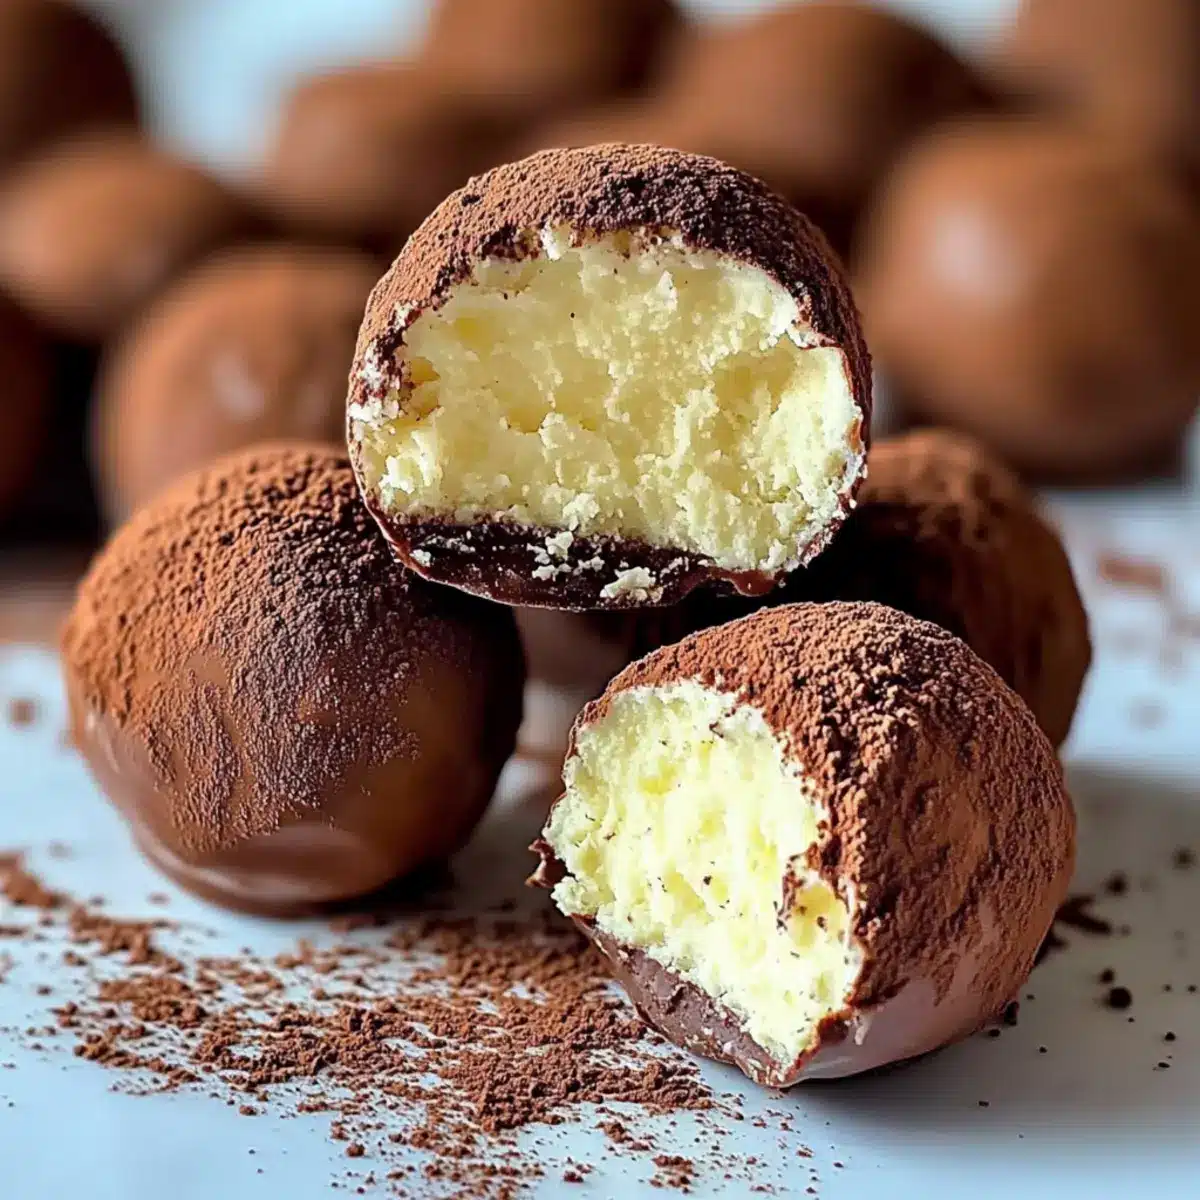
Place the rolled truffles on a parchment-lined baking sheet, ensuring they’re spaced apart. Generously dust each truffle with unsweetened cocoa powder, ensuring they’re well coated. The cocoa not only adds flavor but also gives the truffles that classic, finishing touch reminiscent of traditional tiramisu.
Step 7: Final Chill Before Serving
Chill the dusted truffles in the refrigerator for an additional 30 minutes before serving. This final chilling step ensures the truffles are firm and have the perfect texture when enjoyed. When you’re ready to serve, these Tiramisu Truffles will be the highlight of your dessert table, ready to impress your guests!
What to Serve with Tiramisu Truffles?
Indulging in Tiramisu Truffles opens the door to a world of delightful pairings that enhance your dessert experience.
- Rich Coffee: The bold flavors of a freshly brewed espresso or dark roast coffee perfectly complement the truffles’ coffee notes.
- Creamy Gelato: Vanilla or coffee gelato adds a silky texture, creating a luxurious dessert duo that feels decadent and satisfying.
- Fresh Berries: Juicy raspberries or strawberries provide a refreshing tartness that contrasts the sweetness of the truffles, brightening each bite.
- Chocolate Milkshake: A thick, chocolatey shake mirrors the richness of the truffles, making it a kid-friendly treat that adults will love too.
- Sparkling Wine: A light prosecco or champagne adds sophistication to your dessert table, offering a bubbly finish to the indulgent experience.
- Chocolate Drizzle: Drizzling melted dark chocolate over the truffles before serving adds an extra layer of luxury and visual appeal.
- Whipped Cream: A dollop of lightly sweetened whipped cream enhances the creaminess of the truffles, elevating the tasting experience.
- Mini Fruit Tarts: These delightful, bite-sized tarts can offer a fresh, fruity option alongside the rich Tiramisu Truffles, creating a balanced selection.
Tiramisu Truffles Variations & Substitutions
Customize your Tiramisu Truffles for a unique twist that tantalizes the tastebuds and satisfies any sweet cravings!
- Gluten-Free: Substitute ladyfinger crumbs with gluten-free graham crackers, ensuring everyone can enjoy these indulgent bites.
- Vegan-Friendly: Use a dairy-free cream cheese alternative and omit any liqueurs to make these truffles suitable for a vegan dessert spread.
- Flavor Infusion: Experiment with flavored coffee liqueurs like hazelnut or caramel to enhance the overall flavor profile. Each variation adds a delightful surprise!
- Chocolate Lovers: For a decadent twist, dip the truffles in melted dark chocolate instead of dusting them with cocoa powder. This creates a rich outer layer that’s hard to resist.
- Boozy Upgrade: Incorporate a splash of flavored rum or whiskey for an adult treat. Just remember to keep it minimal; a little goes a long way in adding depth.
- Nutty Textures: Fold in chopped toasted nuts, such as almonds or hazelnuts, for a delightful crunch that contrasts beautifully with the creamy filling.
- Reduced Sugar: Swap out powdered sugar for a sugar alternative, such as erythritol or monk fruit sweetener, for a lower-calorie option with no sacrifice on taste.
- Coating Variations: Instead of cocoa powder, roll the truffles in finely crushed espresso beans or coconut flakes for a fun and unique appearance.
These adaptable ideas can elevate your dessert game, making them perfect for any occasion. For more delightful recipes, don’t miss out on my Tiramisu Truffles Decadent or give the seasonal influence of Pumpkin Tiramisu Fall a try!
Make Ahead Options
Tiramisu Truffles are perfect for busy cooks looking to streamline their dessert preparations. You can prepare the filling up to 24 hours in advance by simply following the recipe up until the chilling step, then refrigerate the mixture covered. This not only saves you time on the day of serving but allows the flavors to meld beautifully. When you’re ready to finish up, just scoop and roll the chilled mixture into truffles, dust them with cocoa powder, and give them a final chill for 30 minutes. This ensures they maintain their creamy texture and taste just as delicious as if made fresh! Enjoy the convenience of these make-ahead treats without sacrificing quality.
Expert Tips for Tiramisu Truffles
- Chill Ingredients: Using chilled ingredients helps maintain the firmness of the filling, ensuring your Tiramisu Truffles hold their shape.
- Softened Cream Cheese: Ensure your cream cheese is softened just enough to blend smoothly. If it’s too soft, it can create a loose mixture.
- Avoid Sticking: Use damp hands or gloves while shaping the truffles. This prevents the mixture from sticking, making rolling easier and cleaner.
- Don’t Rush Chilling: Allow sufficient time for chilling between steps. Thorough chilling is essential for optimal texture and flavor development.
- Creative Variations: Experiment with flavored liqueurs like amaretto or caramel to add exciting new layers to your Tiramisu Truffles.
How to Store and Freeze Tiramisu Truffles
Fridge: Store Tiramisu Truffles in an airtight container in the refrigerator for up to 5 days to maintain their freshness and texture.
Freezer: For longer storage, freeze the truffles in a single layer on a baking sheet. Once firm, transfer them to an airtight container and freeze for up to 1 month.
Thawing: When ready to enjoy, thaw the frozen Tiramisu Truffles in the refrigerator overnight for the best flavor and consistency.
Reheating: These truffles are intended to be served chilled; there is no need to reheat. Just dust with cocoa powder before serving for an elegant touch!
Tiramisu Truffles Recipe FAQs
What type of mascarpone cheese should I use?
Absolutely! For the best flavor in your Tiramisu Truffles, use high-quality Italian mascarpone. The smooth, creamy texture will make a significant difference in the overall taste and richness of your truffles.
How should I store my Tiramisu Truffles?
You can store your Tiramisu Truffles in an airtight container in the refrigerator for up to 5 days. Just be sure that they are fully chilled before sealing to maintain their delightful texture. If you’re planning to keep them longer, follow the freezing instructions below!
Can I freeze Tiramisu Truffles, and if so, how?
Yes, you can freeze Tiramisu Truffles for up to 1 month! Start by placing the rolled truffles in a single layer on a parchment-lined baking sheet, and freeze until firm. Then, transfer them to an airtight container or zip-top bag. When you’re ready to enjoy them, simply thaw in the fridge overnight. They’ll taste just as delightful as when you first made them!
What if my truffle mixture is too loose to shape?
Very! If your mixture is too loose, don’t fret! This often happens if the cream cheese or mascarpone is too soft. Simply chill the mixture in the refrigerator for an additional 30 minutes to an hour until it firms up. You can also try adding a touch more ladyfinger crumbs, which will help thicken the mixture.
Are Tiramisu Truffles suitable for people with dietary restrictions?
Yes! Tiramisu Truffles are vegetarian, making them a great treat for many. However, if you’re concerned about gluten, consider substituting the ladyfinger crumbs with gluten-free graham crackers. Additionally, you can choose to omit the optional coffee liqueur to make them even more inclusive for those who avoid alcohol.
Can I add different flavors to my Tiramisu Truffles?
Absolutely! You can make your Tiramisu Truffles uniquely yours by experimenting with different flavors of liqueur such as hazelnut or even caramel. These variations not only enhance the taste but also add a personal touch to your truffles!
Tiramisu Truffles: No-Bake Italian Treats You’ll Love
Ingredients
Equipment
Method
- In a large bowl, beat together 8 ounces of mascarpone cheese and 4 ounces of softened cream cheese using an electric mixer on medium speed until smooth and fluffy, about 2-3 minutes.
- Add ½ cup of powdered sugar, 1 teaspoon of vanilla extract, and 2 tablespoons of instant espresso powder to the cream mixture. Continue mixing until all ingredients are well incorporated, approximately 1-2 minutes.
- Gently fold in 1 cup of ladyfinger crumbs and optionally, 2 tablespoons of dark chocolate shavings using a spatula.
- Cover the bowl with plastic wrap and refrigerate for at least 1 hour.
- With damp hands, scoop out portions of the chilled mixture, about 1 inch in diameter, and roll them into smooth balls.
- Place the rolled truffles on a parchment-lined baking sheet and dust each truffle with unsweetened cocoa powder.
- Chill the dusted truffles in the refrigerator for an additional 30 minutes before serving.
Leave a Reply