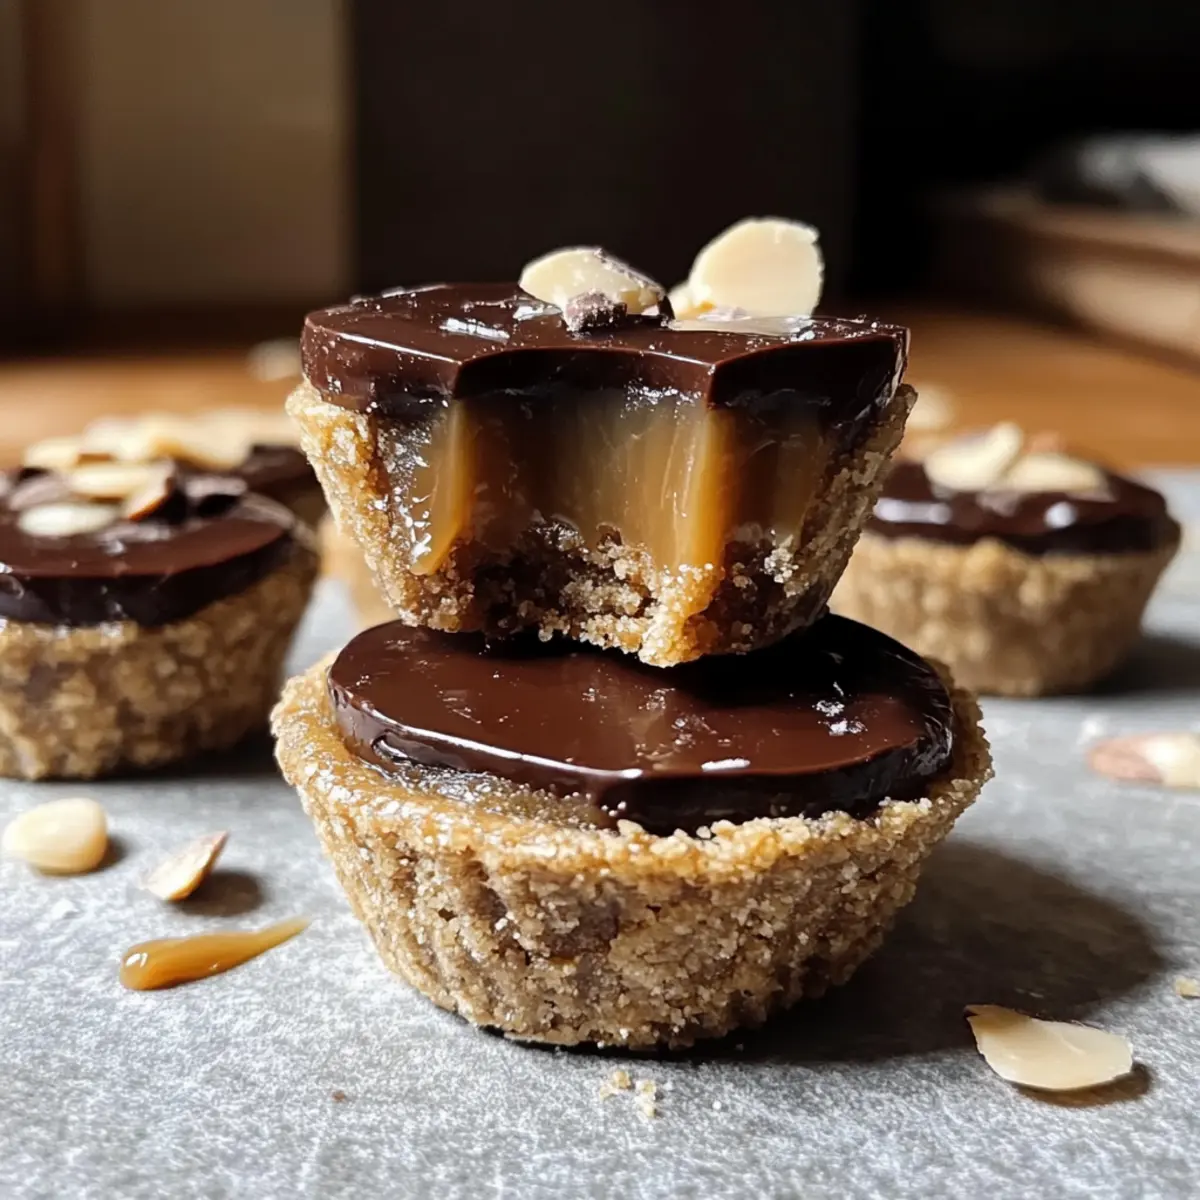
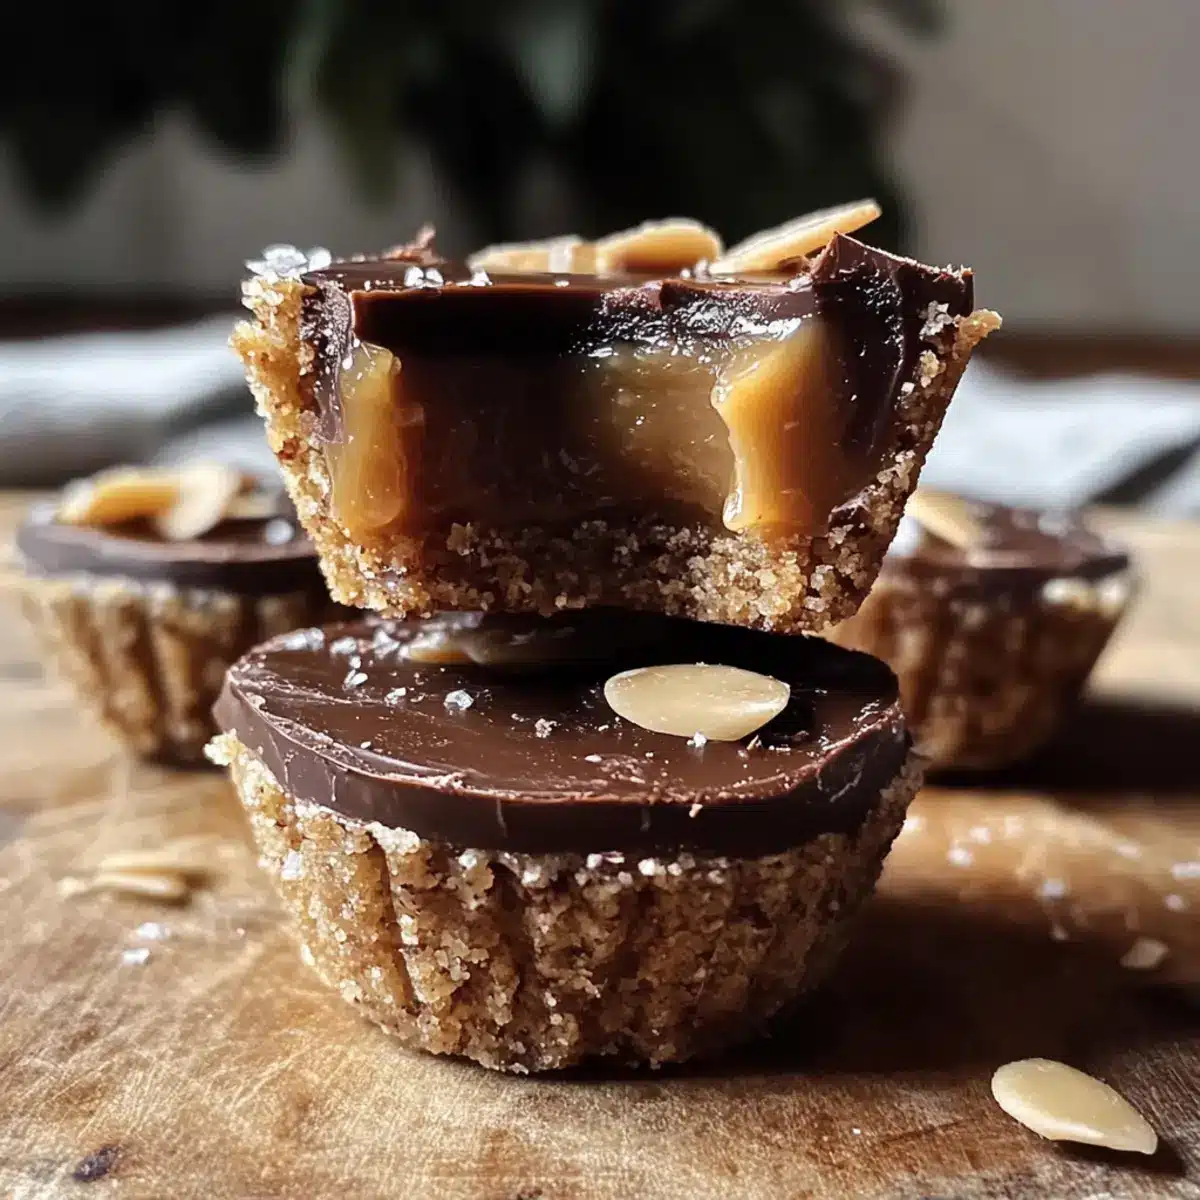
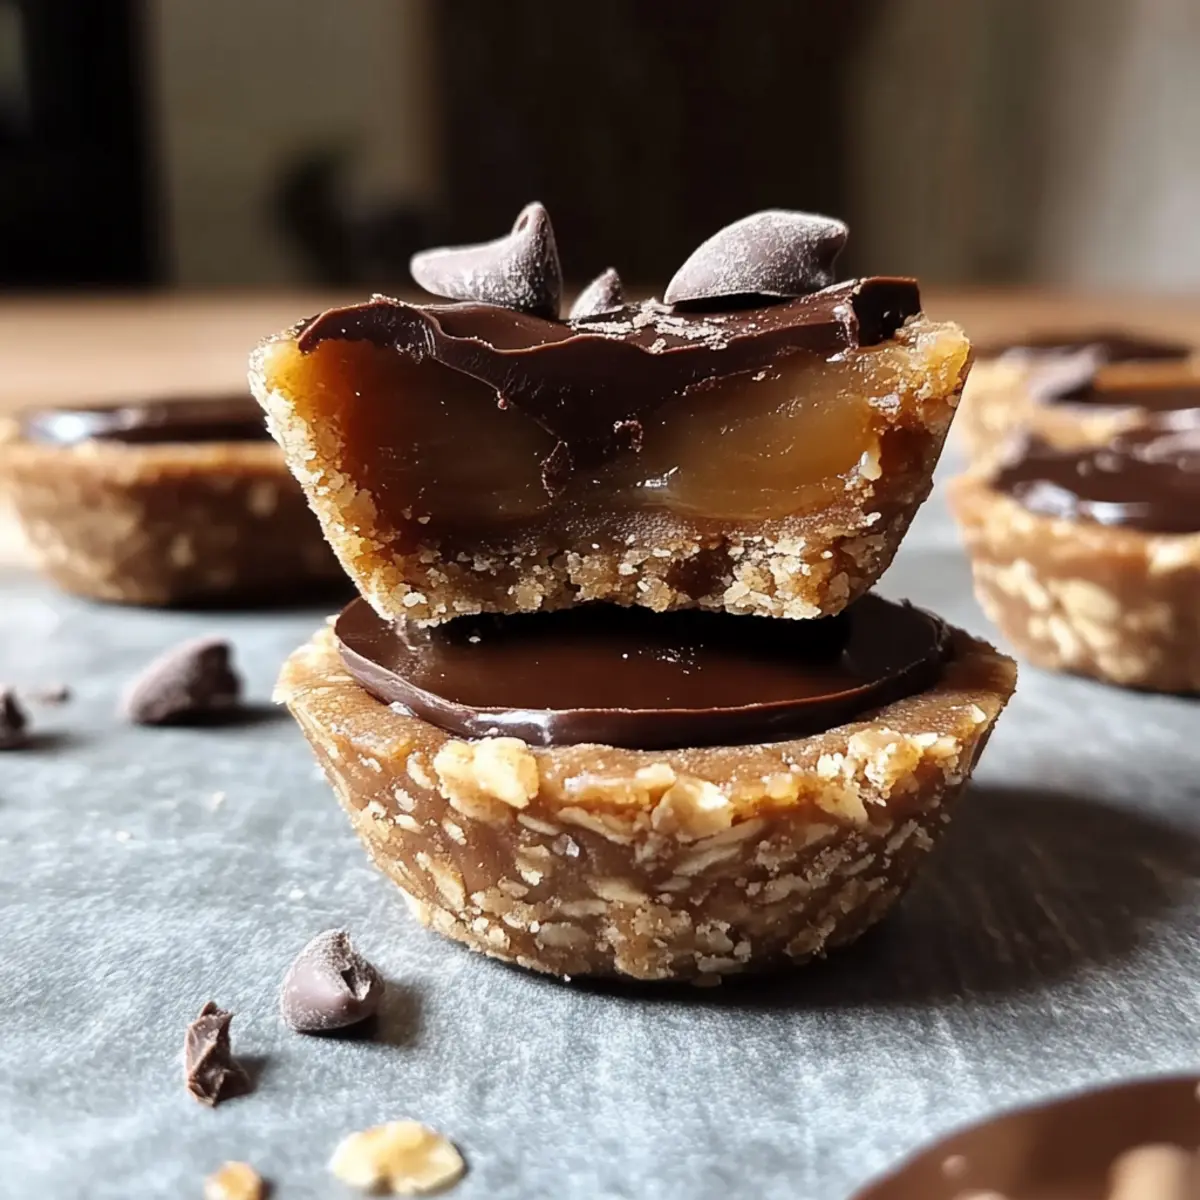
As I rummaged through my pantry searching for a sweet fix, I stumbled upon the perfect solution: Healthy Twix Cups! These delightful little treats are not only a nod to the classic candy but also embrace a guilt-free lifestyle. Combining a crunchy almond flour base with a smooth, nutty caramel layer topped in luscious dark chocolate, they bring joy to anyone seeking a healthier dessert option. Whipping these cups up is a breeze, making them a fantastic choice for busy evenings or as a nutritious snack for those afternoon cravings. Plus, they’re vegan and paleo, so everyone can indulge! Ready to learn the secret to creating these mouthwatering delights that will have you rethinking your dessert game? Let’s dive in!
Why are Healthy Twix Cups a Game-Changer?
Guilt-free Indulgence: These Healthy Twix Cups allow you to satisfy your sweet cravings without the added sugars.
Quick and Easy: With just a few simple steps, you can whip these no-bake delights up in no time—perfect for busy lifestyles.
Versatile Flavor Combinations: Switch up the nut butter or use different flours to customize based on your dietary needs; the options are endless!
Crowd-Pleasing Snack: Ideal for parties, lunchboxes, or even a healthy breakfast option, these cups will impress everyone with their rich flavors.
Loaded with Nutrition: Packed with wholesome ingredients, they provide a delicious yet guilt-free treat that is aligned with your health goals—unlike traditional sweets!
Healthy Twix Cups Ingredients
For the Crust
- Almond Flour – A nutty base that adds texture; can be substituted with sunflower seed flour for a nut-free option.
- Coconut Flour – Provides sweetness and moisture; if substituting, use less almond flour as coconut flour absorbs more liquid.
- Coconut Oil – Helps bind the crust together; can be replaced with melted vegetable oil if preferred.
- Maple Syrup – A natural sweetener for added flavor; agave syrup can work as an alternative if you’re looking for a different taste.
- Sea Salt – Enhances flavors; don’t skip this to balance the sweetness!
For the Caramel Filling
- Medjool Dates – Provide gooey sweetness; swapping for dried apricots or figs will change the flavor, so adjust your sweetness accordingly.
- Almond Butter – Creates a creamy texture; any nut or seed butter like cashew or tahini works well for a nut-free version.
- Coconut Cream – Adds richness to the caramel; feel free to use more or less based on your desired consistency.
- Vanilla Extract – Adds aromatic flavor; optional but recommended for depth.
For the Topping
- Dairy-Free Dark Chocolate – Ensures the recipe stays vegan while giving you that rich chocolate finish; substitute with a mixture of cacao powder and coconut oil if desired.
- Flaked Sea Salt or Chopped Almonds – Optional to sprinkle on top for an extra touch of flavor and decoration.
These Healthy Twix Cups are not just scrumptious but also a testament to how delightful and satisfying guilt-free treats can be!
Step‑by‑Step Instructions for Healthy Twix Cups (Vegan, Paleo)
Step 1: Preheat the Oven
Begin by preheating your oven to 350°F (175°C). This step ensures that your crust will bake evenly, providing a perfect texture for the Healthy Twix Cups. While the oven heats, gather a mini muffin tin or silicone molds and line them with parchment paper for easy removal later.
Step 2: Make the Crust Mixture
In a large mixing bowl, combine almond flour, coconut flour, melted coconut oil, maple syrup, and a pinch of sea salt. Mix vigorously until a crumbly dough forms; this should take about 2-3 minutes. The mixture should hold together when squeezed; if not, add a tiny bit more coconut oil.
Step 3: Press the Crust
Take the crust mixture and evenly press it into the bottom and sides of the lined muffin tin or molds. Use your fingers or a small measuring cup for an even layer, ensuring some thickness for structural integrity. Bake in the preheated oven for 8-10 minutes, or until golden brown. Once baked, remove the tin and allow the crusts to cool completely.
Step 4: Prepare the Caramel Filling
While the crust cools, it’s time to make the luscious caramel filling. In a food processor, blend soaked Medjool dates with almond butter, coconut cream, vanilla extract, and a pinch of salt. Blend until completely smooth, which should take about 1-2 minutes. If it’s too thick, add a little more coconut cream until you reach a creamy consistency suitable for spreading.
Step 5: Assemble the Cups
Once the crusts have cooled, carefully spread a generous layer of the caramel filling over each crust. Make sure to smooth it out evenly, covering all edges. Place the filled cups in the freezer for about 15 minutes, allowing the caramel to set slightly before topping with chocolate.
Step 6: Melt the Chocolate Topping
In a microwave-safe bowl, combine dairy-free dark chocolate chips with a splash of coconut oil. Heat in 20-second intervals, stirring in between, until the chocolate is melted and glossy. This generally takes about a minute. Ensure not to overheat to prevent burning.
Step 7: Finish the Cups
Once your chocolate has melted, remove the cups from the freezer and spoon the chocolate topping generously over the caramel layer. Feel free to sprinkle flaked sea salt or chopped almonds on top for added flavor and decoration.
Step 8: Chill Until Firm
Refrigerate or freeze the Healthy Twix Cups for at least 30 minutes, allowing the chocolate to firm up completely. Once solidified, gently remove the cups from the molds and savor these delicious, guilt-free treats!
Make Ahead Options
These Healthy Twix Cups are perfect for meal prep enthusiasts! You can prepare the crust and caramel filling up to 3 days in advance, allowing for a quick assembly when you’re ready to indulge. To do this, assemble the crust and fill it with the caramel layer, then cover and refrigerate them separately. To maintain quality, ensure the crust is completely cooled before adding the caramel, preventing any sogginess. When you’re ready to serve, simply melt the dairy-free dark chocolate and spoon it over the set caramel, then refrigerate until firm. This way, you’ll have delightful, guilt-free treats waiting for you with minimal effort on busy weeknights!
Storage Tips for Healthy Twix Cups
Fridge: Store your Healthy Twix Cups in an airtight container in the refrigerator for up to 1 week. This keeps them fresh and ready for a sweet snack anytime!
Freezer: For longer storage, freeze the cups, separating layers with parchment paper to avoid sticking. They can last up to 2 months in the freezer while maintaining flavor and texture.
Thawing: When ready to enjoy, simply remove from the freezer and allow the Healthy Twix Cups to thaw in the fridge for about an hour, or at room temperature for 15-20 minutes before serving.
Reheating: If you prefer a softer chocolate topping, gently microwave the cups in 10-second intervals until warm—not too long, or the chocolate will melt!
What to Serve with Healthy Twix Cups?
Imagine creating a delightful spread that complements the lusciousness of your Healthy Twix Cups while tantalizing the taste buds.
- Vibrant Fruit Salad: Bursting with colors and flavors, a refreshing fruit salad adds a light and zesty contrast to the rich, decadent cups.
- Creamy Coconut Yogurt: Spoonfuls of this fluffy delight provide a luxurious creaminess that pairs beautifully with the crunch and sweetness of the cups.
- Nutty Granola: A crunchy sprinkle of nutty granola offers delightful texture and wholesome ingredients, enhancing the overall nutritious experience.
- Herbal Iced Tea: A chilled, refreshing herbal tea balances the sweetness of the Healthy Twix Cups, adding elegance and quenching any thirst.
- Dark Chocolate-Covered Almonds: Elevate your snack table with these crunchy treats—they complement the chocolate topping and add an extra layer of indulgence.
- Decadent Nut Butter Dipping Sauce: Drizzle or dip in a smooth nut butter blend to enrich the flavors and create a unique tasting experience each time.
These pairings not only enhance the flavor profile of your Healthy Twix Cups but also create a well-rounded meal or snack experience that everyone will love!
Expert Tips for Healthy Twix Cups
-
Soak Dates: Soak Medjool dates in hot water for 10-15 minutes to soften them. This will ensure a silky-smooth caramel layer in your Healthy Twix Cups.
-
Cooling Time: Allow the crust to cool completely before adding the caramel layer. This prevents the caramel from melting into the crust and helps maintain distinct layers.
-
Adjust Consistency: If your caramel filling is too thick, don’t hesitate to add more coconut cream gradually until it’s spreadable. The right texture is key to a delicious filling!
-
Storing Options: Keep your Healthy Twix Cups in an airtight container for up to one week in the fridge or freeze them for longer storage. Just remember to separate layers with parchment paper!
-
Customize Flavors: Experiment with different nut/seed butters and flours based on your preferences or dietary needs, elevating the flavors to make these cups uniquely yours!
Healthy Twix Cups: Fun Variations
Feel free to get creative and customize your Healthy Twix Cups to suit your own taste buds!
-
Nut-Free Option: Use sunflower seed butter instead of almond butter to create a nut-free version that’s just as delicious.
-
Flour Swap: Instead of almond flour, try using coconut flour for a different texture. Just remember to use less since it’s highly absorbent!
-
Flavor Twist: Spice things up by adding a pinch of cinnamon or a dash of sea salt to the caramel layer for that extra pop of flavor.
-
Caramel Alteration: Experiment with different dried fruits instead of Medjool dates, like dried figs or apples, to create unique caramel flavors just for you.
-
Chocolate Change: Switch out dairy-free chocolate for a drizzle of white chocolate or a homemade dairy-free option for a delightful twist.
-
Textural Boost: Top your cups with chopped nuts or seeds for an addictive crunch that complements the smoothness of the caramel and chocolate.
-
Extra Sweetness: If you crave a sweeter treat, drizzle some maple syrup over the chocolate topping right before it fully sets.
-
Party Delight: Serve these cups on a platter and drizzle with melted chocolate for a show-stopping dessert during gatherings, showcasing a lovely balance of flavors.
Feel free to explore these variations, and for more delightful recipes, check out these Healthy Pumpkin Spice treats or indulge in our tasty Sticky Chicken Bowls for a savory fix!

Healthy Twix Cups Recipe FAQs
What type of almond flour should I use for the crust?
I recommend using blanched almond flour for a finer texture that mimics traditional flour. If you have almond meal on hand, it can work too, but it may create a coarser crust. If nuts are a concern, sunflower seed flour is an excellent nut-free alternative!
How should I store Healthy Twix Cups for best freshness?
Store your Healthy Twix Cups in an airtight container in the refrigerator for up to 1 week. For longer storage, freeze them, making sure to separate the layers with parchment paper to prevent sticking. They can be kept in the freezer for up to 2 months.
Can I freeze Healthy Twix Cups, and if so, how?
Absolutely! After your Healthy Twix Cups are assembled and chilled, place them in a single layer on a baking sheet and freeze until solid. Then, transfer them to an airtight container, layering parchment paper between cups. They can be frozen for up to 2 months without losing flavor.
What if my caramel filling is too thick?
If your caramel filling ends up too thick, no worries! Simply add more coconut cream a tablespoon at a time until you reach a smoother, spreadable consistency. Blend again to ensure it’s evenly mixed—this will give you that luscious texture you want on your Healthy Twix Cups!
Are these Healthy Twix Cups safe for those with allergies?
Yes! These cups can be tailored for various dietary restrictions. Use seed butters like sunflower seed butter for nut allergies and ensure your chocolate is dairy-free for vegan diets. Always check ingredient labels to ensure there are no cross-contaminants if allergies are a concern.
How can I enjoy Healthy Twix Cups as a breakfast option?
These cups are versatile! They can be enjoyed straight from the fridge or warmed slightly in the microwave for a more decadent experience. Pair them with a side of fruit or yogurt for a balanced breakfast that satisfies both your cravings and nutritional needs!
Guilt-Free Healthy Twix Cups (Vegan, Paleo) You'll Love
Ingredients
Equipment
Method
- Preheat your oven to 350°F (175°C) and prepare a mini muffin tin or silicone molds with parchment paper.
- In a large mixing bowl, combine almond flour, coconut flour, melted coconut oil, maple syrup, and a pinch of sea salt. Mix until a crumbly dough forms.
- Press the crust mixture into the bottom and sides of the lined muffin tin or molds. Bake for 8-10 minutes until golden brown. Allow to cool completely.
- In a food processor, blend soaked Medjool dates with almond butter, coconut cream, vanilla extract, and a pinch of salt until smooth. Adjust with more coconut cream if too thick.
- Spread a layer of the caramel filling over each cooled crust and place in the freezer for about 15 minutes to set.
- Melt dairy-free dark chocolate and a splash of coconut oil in a microwave-safe bowl, stirring until glossy.
- Spoon the melted chocolate over the caramel layer, adding flaked sea salt or chopped almonds if desired.
- Refrigerate or freeze for at least 30 minutes until firm. Gently remove from molds and enjoy!
Leave a Reply