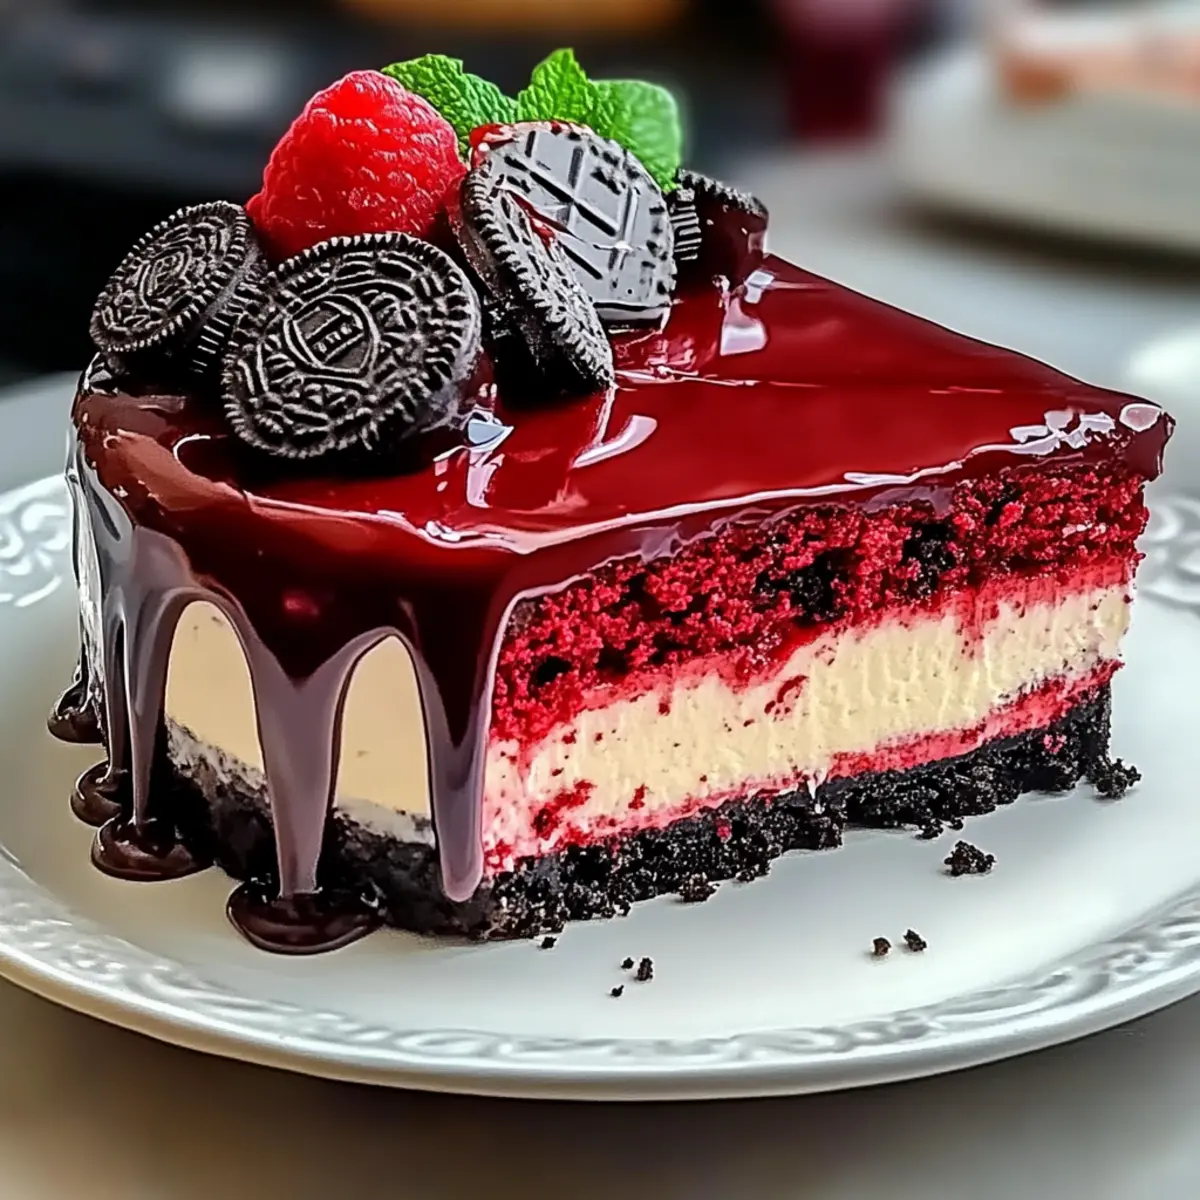
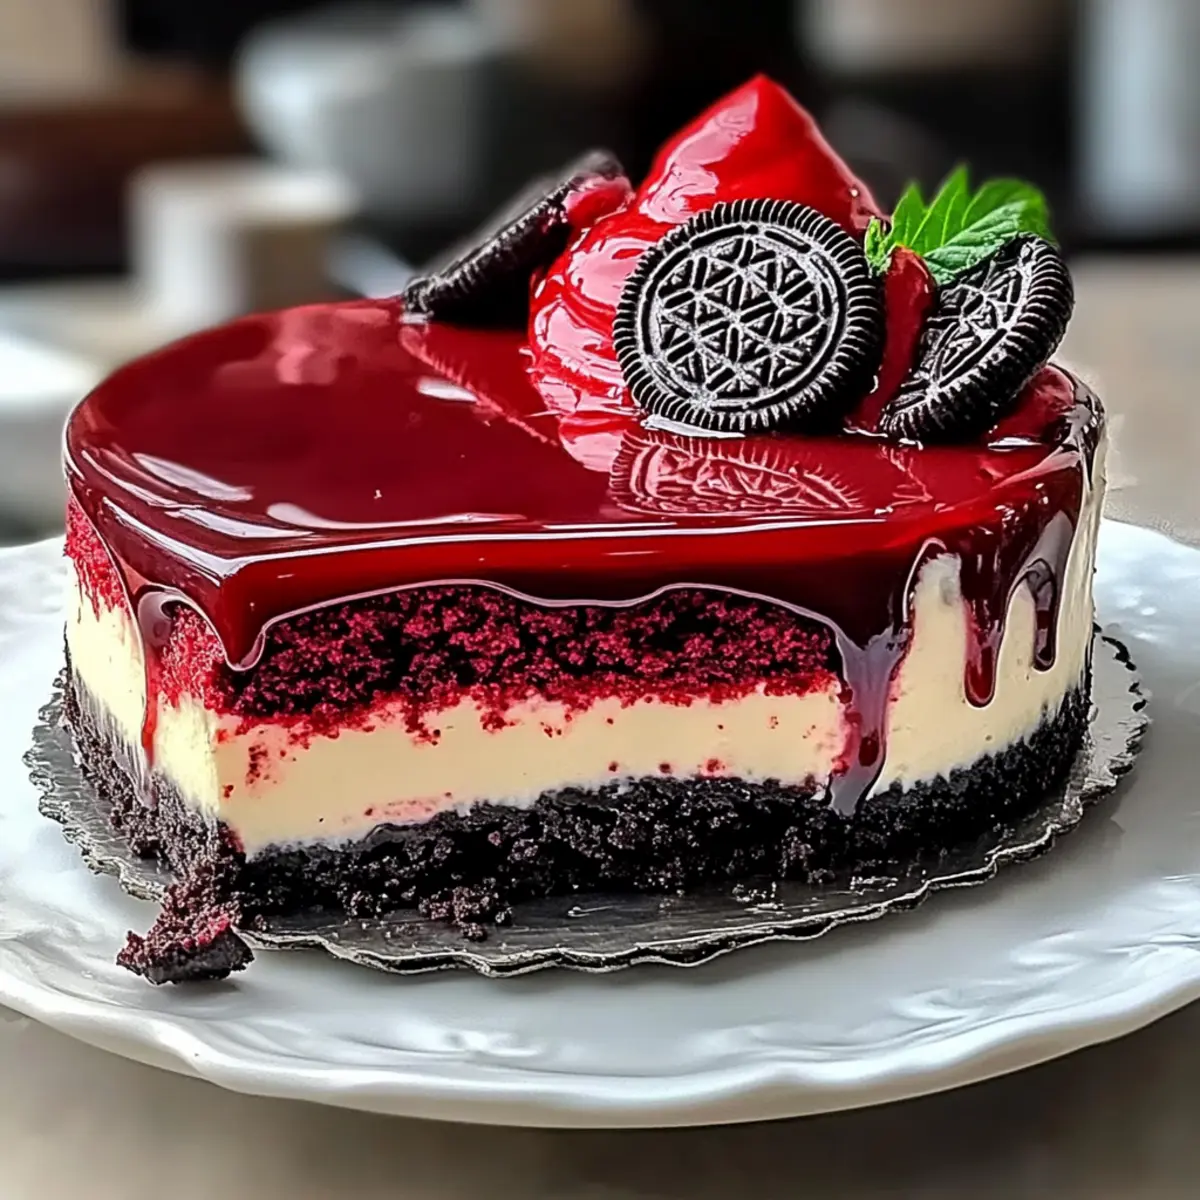
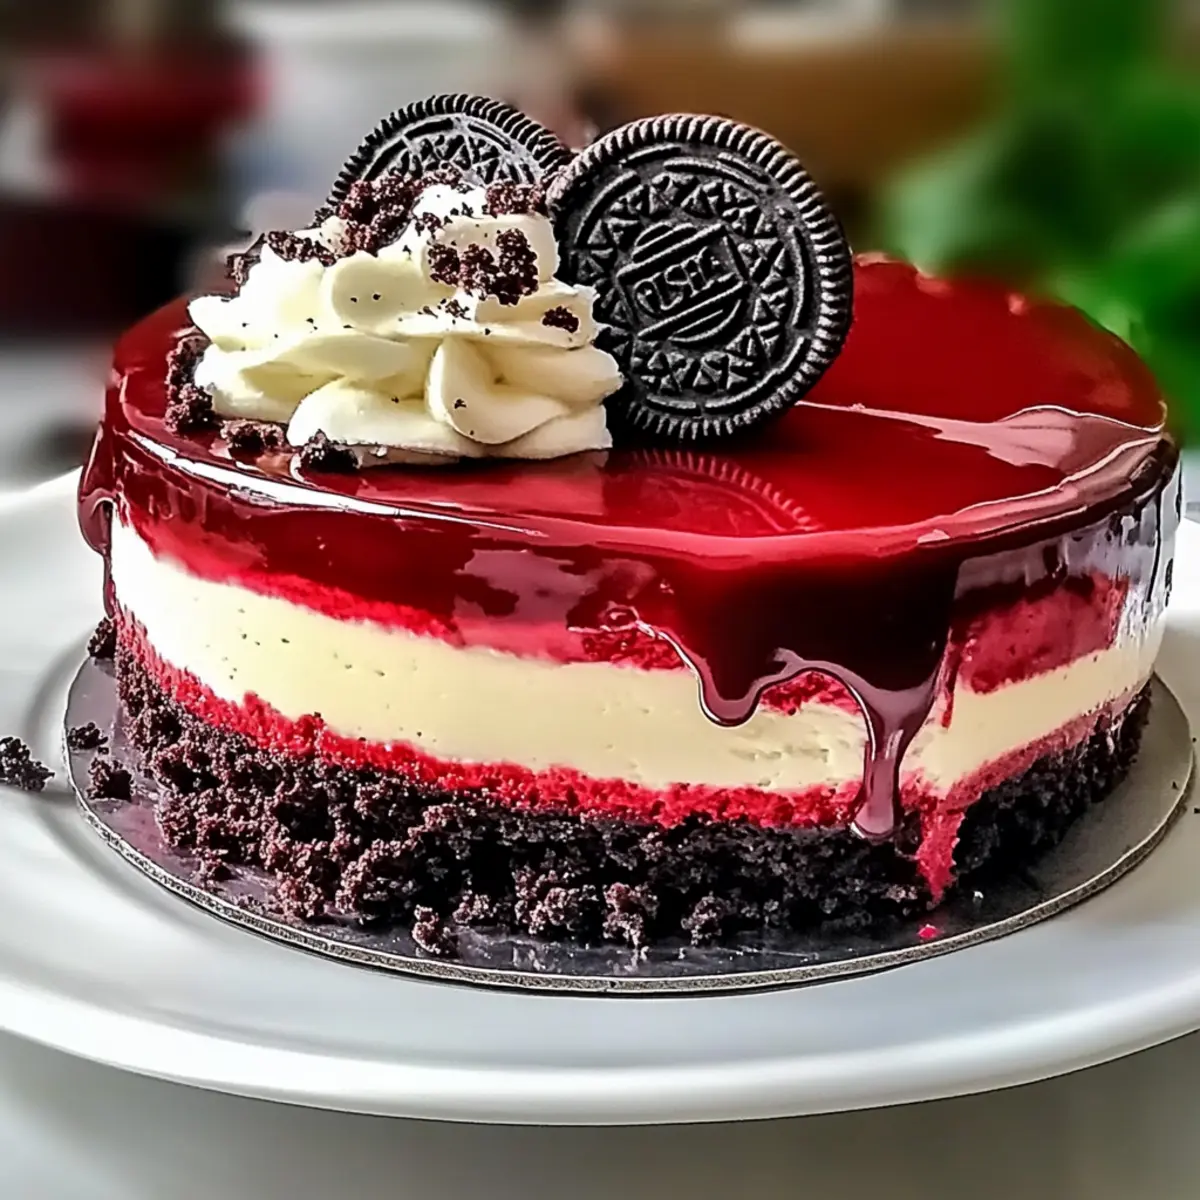
The first slice of this stunning Red Velvet Cheesecake feels like a decadent hug from inside the oven, enveloping your senses with its rich aroma. Combining the classic allure of red velvet cake with a velvety Oreo cheesecake filling, this dessert is a true showstopper that wows at any gathering. What I adore about this recipe is its quick prep time, allowing you to whip up an impressive masterpiece without stress. Plus, with a few simple adjustments, it can easily become gluten-free! Perfect for birthdays, holidays, or just a weekday indulgence, this cheesecake not only pleases the eyes but also offers an unforgettable taste experience. Curious about how to create this irresistible treat that boasts layers of flavor? Let’s dive into the delicious details!
Why is this Red Velvet Cheesecake special?
Irresistible flavor: Each bite combines the tang of cheese with the sweet notes of red velvet, delivering a luxurious taste experience that will leave everyone craving more.
Visually stunning: The bold red layers topped with rich chocolate ganache create a show-stopping dessert that’s perfect for special occasions.
Time-efficient: With a straightforward prep process, you can easily impress your guests without spending all day in the kitchen.
Gluten-free options: Easily swap in gluten-free flour to cater to dietary needs, making this cheesecake inclusive for all guests.
Crowd-pleaser: Whether it’s a birthday or holiday, this recipe is sure to be a hit, bringing smiles and ‘oohs and aahs’ with every slice. Try serving it alongside Crisp Mini Cheesecakes for a delightful dessert spread!
Red Velvet Cheesecake Ingredients
For the Cake Layers
• All-Purpose Flour – Structure. Use gluten-free flour blend as a substitute if needed.
• Cocoa Powder – Adds depth and chocolate flavor. Ensure it is unsweetened.
• Salt – Enhances flavor.
• Butter – Provides richness and moisture. Ensure butter is softened to room temperature.
• Granulated Sugar – Sweetness and helps in creaming with butter.
• Sour Cream – Adds moisture and tanginess. Full-fat recommended for best results.
• Vegetable Oil – Moisture and tender texture. Can use olive oil or melted coconut oil as alternatives.
• Vanilla Extract – Flavor enhancement.
• Eggs – Binding and structure. Ensure eggs are at room temperature for better mixing.
• Red Food Coloring – For color. Gel coloring recommended for intensity.
• Buttermilk – Adds moisture and acidity. Substitute with milk and vinegar if unavailable.
• Baking Soda – Leavening agent.
• Vinegar – Reacts with baking soda for lift.
For the Oreo Cheesecake Filling
• Oreo Cookies – For cheesecake filling and topping. Substitute with any chocolate sandwich cookies.
• Cream Cheese – For the creamy cheesecake filling. Use full-fat for best texture.
• Cornstarch – Stabilizer for cheesecake filling.
• Heavy Cream – For the ganache texture.
For the Ganache Topping
• Dark Chocolate Chips – For ganache. Can substitute with semi-sweet chocolate.
• Heavy Cream – Ensures a silky texture when combined with chocolate.
Let’s get ready to create a beautiful Red Velvet Cheesecake that will surely impress!
Step‑by‑Step Instructions for Indulgent Red Velvet Cheesecake with Oreo Filling
Step 1: Preheat the Oven
Preheat your oven to 350°F (175°C) and gather a 9-inch springform pan alongside an 8-inch round cake pan. Line the bottoms with parchment paper and spray the sides with non-stick spray to ensure easy release of your Red Velvet Cheesecake layers once baked.
Step 2: Mix Dry Ingredients
In a mixing bowl, whisk together 2 cups of all-purpose flour, 2 tablespoons of unsweetened cocoa powder, and a pinch of salt. This step enhances the flavors and ensures an even texture for your red velvet cake. Set this dry mixture aside while you move on to the wet ingredients.
Step 3: Cream Butter and Sugar
In a large bowl, cream together 1 cup of softened butter and 2 cups of granulated sugar until light and fluffy, which should take about 3-5 minutes. Add in 1 cup of sour cream, 1/2 cup of vegetable oil, 1 tablespoon of vanilla extract, and 2 large eggs, plus 1 tablespoon of red food coloring. Mix well until all the ingredients are fully incorporated.
Step 4: Combine Wet and Dry Ingredients
Gradually add the dry mixture into the wet batter, alternating with 1 cup of buttermilk. Mix until just combined to keep the texture light. Finally, fold in 1 teaspoon of baking soda and 1 teaspoon of vinegar to add the perfect lift to your Red Velvet Cheesecake layers.
Step 5: Bake the Cake Layers
Divide the prepared batter evenly between your two pans and smooth the tops. Bake in the preheated oven for about 18-20 minutes or until a toothpick inserted into the center comes out clean. Allow the cake layers to cool completely on wire racks before assembling.
Step 6: Prepare the Oreo Cheesecake Filling
While the cakes cool, process approximately 1 1/2 cups of Oreo cookies into fine crumbs in a food processor. In a bowl, beat together 16 ounces of cream cheese and the Oreo crumbs until smooth, then mix in 3/4 cup of granulated sugar and 2 tablespoons of cornstarch, ensuring a creamy consistency.
Step 7: Add Remaining Ingredients
Next, add in 1 cup of sour cream, 1 teaspoon of vanilla, and 2 large eggs (plus 1 egg yolk) to the Oreo mixture. Mix just until combined to prevent overmixing. Finally, fold in 1 cup of crushed Oreo pieces for that delightful texture contrast in your cheesecake filling.
Step 8: Assemble and Bake the Cheesecake
Pour the Oreo cheesecake batter over one of the cooled red velvet cake layers in the springform pan. Cover the pan with foil and place it in a larger baking dish filled with hot water (a water bath). Bake at 300°F (150°C) for about 90 minutes, or until the cheesecake is set but slightly jiggly in the center.
Step 9: Cool Gradually in the Oven
Once baked, turn off the oven, leaving the cheesecake inside with the door slightly ajar for 1 hour. This gradual cooling process helps prevent cracks. Afterward, refrigerate the cheesecake overnight to let the flavors meld beautifully, resulting in an exceptional Red Velvet Cheesecake.
Step 10: Prepare the Ganache Topping
The next day, prepare the ganache by melting 1 cup of dark chocolate chips with 1/2 cup of heavy cream in a microwave-safe bowl, stopping every 30 seconds to stir until smooth. Pour the ganache over the chilled cheesecake, allowing it to drip down the sides for a visually appealing finish.
Step 11: Add Final Decorations
Before serving, sprinkle crumbled red velvet cake and perhaps a touch of cream cheese frosting on top for extra flair. This final touch will elevate your Indulgent Red Velvet Cheesecake with Oreo Filling, making it an impressive centerpiece that’s sure to delight your guests.
Expert Tips for Red Velvet Cheesecake
-
Room Temperature Ingredients: Make sure all ingredients are at room temperature to achieve a smooth, cohesive batter for your rich Red Velvet Cheesecake.
-
Avoid Overmixing: Once the eggs are added, mix just until combined. Overmixing can incorporate air, leading to cracks in your cheesecake.
-
Water Bath Wisdom: Use a water bath during baking to regulate temperature. This simple step helps create a creamy, velvety texture and prevents drying out.
-
Gradual Cooling: After baking, allow the cheesecake to cool gradually inside the oven. This helps minimize cracks by avoiding sudden temperature changes.
-
Refrigerate Overnight: For the best flavor and texture, refrigerate the cheesecake overnight before serving. This extra resting time melds the flavors beautifully.
Make Ahead Options
These Red Velvet Cheesecake layers are perfect for meal prep, allowing you to enjoy this indulgent dessert without last-minute stress! You can bake the red velvet cake layers up to 24 hours in advance; simply cool them completely, wrap them tightly in plastic wrap, and refrigerate. The Oreo cheesecake filling can also be prepared a day ahead, stored in an airtight container in the refrigerator. When you’re ready to serve, assemble the cake (adding the cheesecake filling over the cake layers) and bake the cheesecake in the water bath. Finish by preparing the ganache just before serving for that luxurious touch; it will still be just as delicious, making your time in the kitchen efficient and enjoyable!
What to Serve with Indulgent Red Velvet Cheesecake with Oreo Filling
Elevate your dessert experience with delightful accompaniments that beautifully complement the rich and creamy layers of your cheesecake.
-
Fresh Berries: Their tartness perfectly balances the sweet creaminess, adding a refreshing pop to each bite. Strawberries or raspberries are particularly lovely garnishes.
-
Whipped Cream: A fluffy dollop enhances the cheesecake’s luxe texture, making every slice feel even more indulgent and luscious. You can add a hint of vanilla or chocolate for extra flair.
-
Vanilla Ice Cream: Creamy and cool, a scoop of vanilla ice cream serves as a delectable contrast to the warmth of the cheesecake, tempting you with its soft and silky texture.
-
Chocolate Sauce: Drizzling rich chocolate sauce adds an additional layer of sweetness, appealing to chocolate lovers and enhancing the decadent experience of the cheesecake’s chocolate ganache.
-
Coffee: The boldness of a cup of coffee complements the dessert beautifully, cutting through the creaminess while enhancing the cake’s chocolate notes.
-
Chocolate-Covered Strawberries: A delightful treat, their sweetness pairs beautifully, making for a visually stunning and tasty contrast on the dessert plate.
-
Nutty Caramel Sauce: A drizzle of warm caramel with a hint of salt adds a luxurious touch, enhancing both flavor and texture while elevating each bite.
Indulge in these pairings to create an unforgettable dessert moment that your guests will adore!
How to Store and Freeze Red Velvet Cheesecake
Fridge: Store leftover Red Velvet Cheesecake in an airtight container for up to five days. This helps maintain its rich texture and flavors while keeping it fresh for indulgent snacking.
Freezer: Freeze slices of cheesecake wrapped tightly in plastic wrap and then aluminum foil for up to three months. Thaw overnight in the fridge before serving to enjoy every luscious bite.
Reheating: If desired, allow the cheesecake to come to room temperature before serving for the best flavor experience. You can also lightly microwave individual slices for a few seconds to enhance the creamy goodness.
Make Ahead: You can prepare the cheesecake a day in advance, as it actually improves in taste and texture when given time to chill and set in the refrigerator overnight.
Red Velvet Cheesecake Customizations
Feel free to get creative and make this delightful cheesecake your own with a few fun variations!
- Gluten-Free: Replace all-purpose flour with a gluten-free flour blend for a deliciously inclusive dessert everyone can enjoy.
- Nutty Twist: Add finely chopped walnuts or pecans to the cake batter for an added crunch and flavor that complements the red velvet beautifully.
- Coconut Cream: For a tropical flair, swap out half of the cream cheese in the filling for coconut cream, lending a light, airy texture to your cheesecake.
- Spiced Up: Incorporate spices like cinnamon or nutmeg into the cake batter to warm up those flavors, creating a cozy vibe perfect for autumn gatherings.
- Minty Fresh: Stir in a bit of peppermint extract to the ganache for a refreshing twist, reminiscent of delightful mint desserts.
- Decadent Swirls: Create beautiful layers by swirling a raspberry or strawberry puree into the cheesecake filling before baking, adding a vibrant color and fresh flavor.
- Oreo Variations: Experiment with different flavored Oreos, like mint or peanut butter, for a unique cheesecake experience that will surprise and delight your taste buds!
- Fruit Toppers: Garnish your finished cheesecake with fresh berries or a drizzle of fruit coulis to enhance both its appearance and flavor, echoing tropical delights like the Orange Creamsicle Mini Cheesecakes.
Let your imagination run wild with these variations, and enjoy every moment of creating a dessert that feels uniquely yours!

Red Velvet Cheesecake Recipe FAQs
How do I choose the right ripeness of ingredients?
Absolutely! For ingredients like eggs and butter, ensure they are at room temperature. This helps in achieving a smooth batter. When selecting your red food coloring, go for gel-based as it provides a more vibrant hue without altering the cake’s moisture.
What’s the best way to store leftover Red Velvet Cheesecake?
Very! Store your cheesecake in an airtight container in the refrigerator for up to 5 days. This will help maintain its creamy texture and delightful flavor. If you want to keep it longer, wrap individual slices tightly in plastic wrap and then in aluminum foil, placing them in the freezer for up to 3 months.
Can I freeze Red Velvet Cheesecake, and how do I do it?
Definitely! To freeze, first, let the cheesecake fully cool in the fridge. Slice it into individual portions, wrap each slice in plastic wrap, and then wrap them again in aluminum foil. Place them in a freezer-safe container. When you’re ready to enjoy, simply thaw overnight in the refrigerator.
What are some common troubleshooting tips for this cheesecake?
If your cheesecake has cracks, it might be due to overmixing or a sudden temperature change. To avoid this, use room-temperature ingredients and bake it in a water bath. Gradually cooling it in the oven will also help prevent cracks. Remember, a perfectly jiggly center is what you want!
Are there any dietary considerations I should keep in mind?
Yes! If you’re making this for someone with gluten sensitivities, you can substitute all-purpose flour with a gluten-free flour blend. Also, consider potential allergens if serving to guests; ensure that you have alternatives for anyone with dairy or nut allergies. The comfort of homemade baking should always be inclusive!
How can I enhance the flavor of my Red Velvet Cheesecake?
Absolutely! Feel free to experiment with flavor extracts. For a twist, try substituting vanilla with almond extract. You might also incorporate other toppings like fresh fruit, nuts, or chocolate shavings for added texture and flavor diversity. Happy baking!
Decadent Red Velvet Cheesecake That Impresses Every Time
Ingredients
Equipment
Method
- Preheat your oven to 350°F (175°C) and gather a 9-inch springform pan alongside an 8-inch round cake pan. Line the bottoms with parchment paper and spray the sides with non-stick spray.
- In a mixing bowl, whisk together 2 cups of all-purpose flour, 2 tablespoons of unsweetened cocoa powder, and a pinch of salt. Set this dry mixture aside.
- In a large bowl, cream together 1 cup of softened butter and 2 cups of granulated sugar until light and fluffy, about 3-5 minutes. Add in 1 cup of sour cream, 1/2 cup of vegetable oil, 1 tablespoon of vanilla extract, and 2 large eggs, plus 1 tablespoon of red food coloring. Mix well.
- Gradually add the dry mixture into the wet batter, alternating with 1 cup of buttermilk. Mix until just combined, then fold in 1 teaspoon of baking soda and 1 teaspoon of vinegar.
- Divide the prepared batter evenly between your two pans and bake for 18-20 minutes. Allow to cool completely on wire racks.
- While the cakes cool, process 1 1/2 cups of Oreo cookies into fine crumbs. Beat together 16 ounces of cream cheese and the Oreo crumbs until smooth. Mix in 3/4 cup of granulated sugar and 2 tablespoons of cornstarch.
- Next, add in 1 cup of sour cream, 1 teaspoon of vanilla, and 2 large eggs (plus 1 egg yolk) to the Oreo mixture. Mix until just combined and fold in 1 cup of crushed Oreo pieces.
- Pour the Oreo cheesecake batter over one of the cooled red velvet cake layers in the springform pan. Cover the pan with foil and place it in a water bath. Bake at 300°F (150°C) for about 90 minutes.
- Turn off the oven, leaving the cheesecake inside with the door slightly ajar for 1 hour. Refrigerate overnight.
- Prepare the ganache by melting 1 cup of dark chocolate chips with 1/2 cup of heavy cream until smooth. Pour over the chilled cheesecake.
- Sprinkle crumbled red velvet cake and cream cheese frosting on top before serving.
Leave a Reply