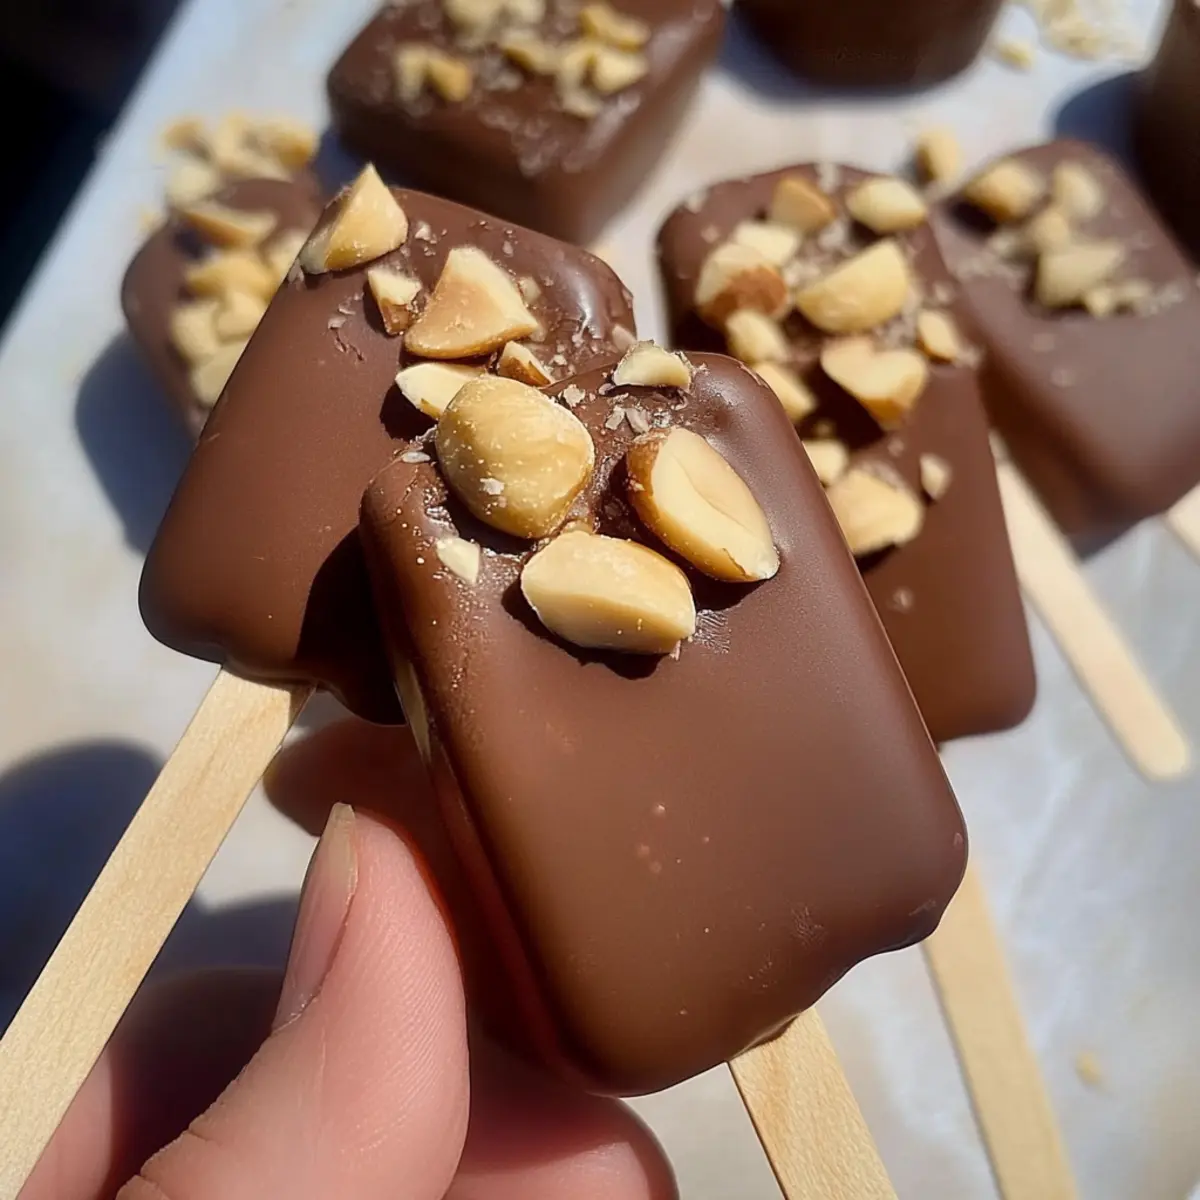
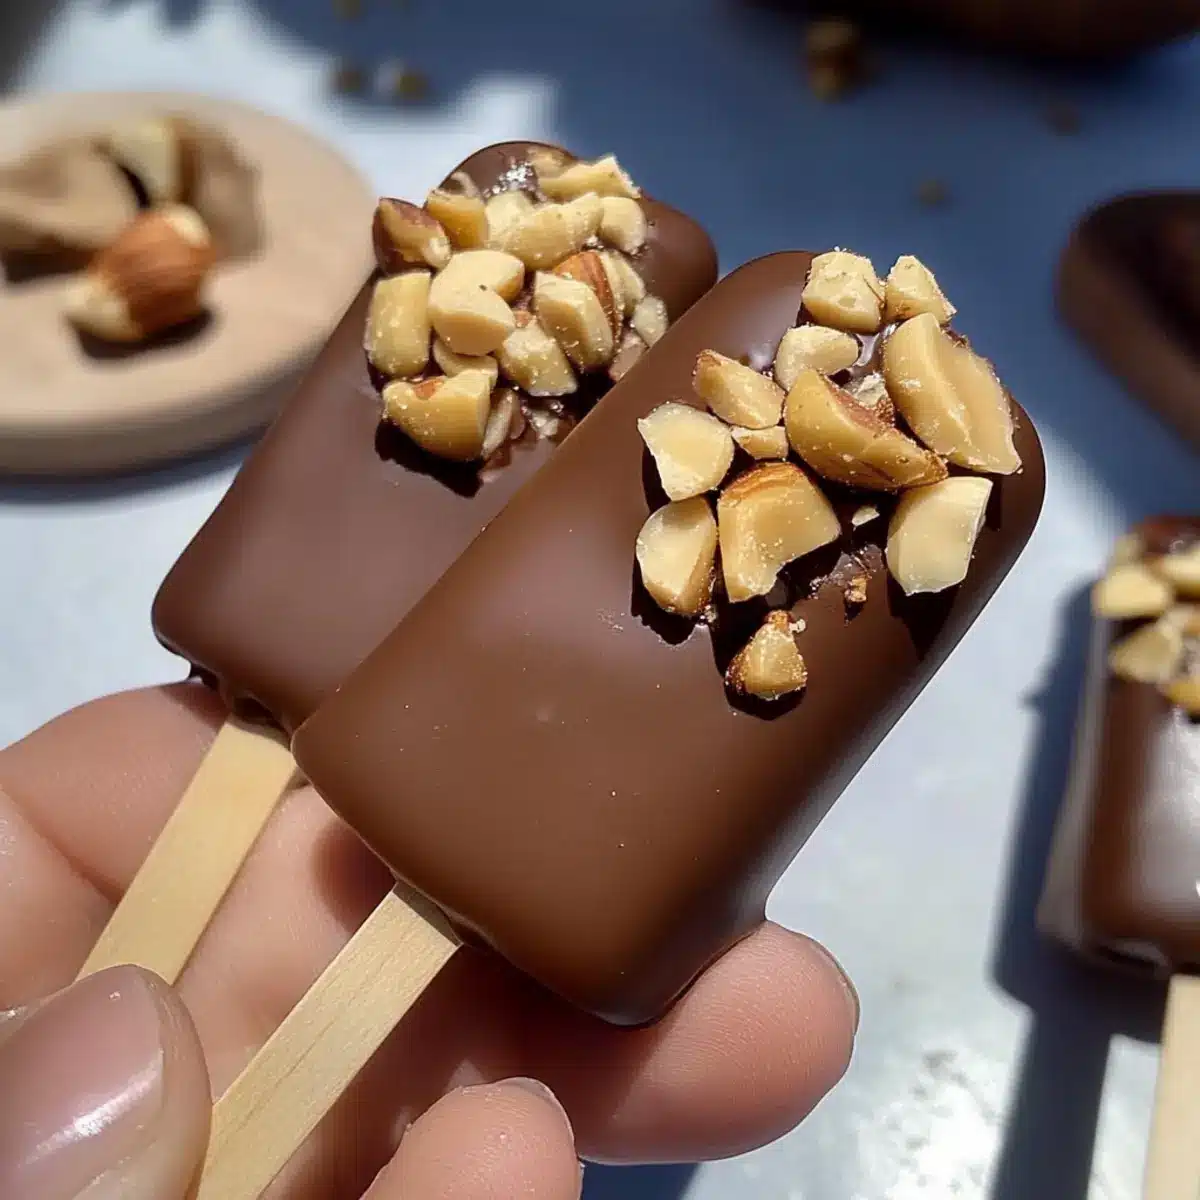
As the summer sun blazes down, there’s nothing quite like reaching for a cool, refreshing treat. That’s why I’ve been absolutely hooked on making these 4-Ingredient Chocolate Hazelnut Yoghurt Pops. With just four simple ingredients, I get to enjoy a creamy, guilt-free indulgence that’s both dairy-free and gluten-free. These pops not only satisfy my sweet tooth but also deliver a delightful crunch from the whole hazelnuts, making them an instant crowd-pleaser. Whether you’re looking for a quick dessert to impress guests at a backyard barbecue or a healthy snack for those hot afternoons, these frozen beauties are a must-try. What flavor combinations are you excited to whip up this summer? Let’s dive into this delish recipe!
Why are these pops a must-try?
Simplicity at its finest: With only four ingredients, you’ll whip these up in no time, perfect for busy summer days or spontaneous dessert cravings.
Guilt-free indulgence: Each pop is not only dairy-free and gluten-free, but they also come in at around 358 calories, allowing you to indulge without the guilt!
Versatile flavors: Mix and match your favorite yoghurt or try different spreads like peanut butter for a fun twist.
Crowd-pleaser: Their rich chocolatey goodness and crunchy nut topping make them a delightful treat your friends and family won’t forget.
Easy to store: Keep a batch in your freezer for when that sweet craving hits, allowing you to enjoy tasty treats anytime.
Explore even more delicious frozen delights with my favorite Chocolate Covered Pretzel and Chocolate Marshmallow Swirl recipes!
Chocolate Hazelnut Yoghurt Pops Ingredients
• Dive into making the most delightful Chocolate Hazelnut Yoghurt Pops with these simple ingredients!
For the Yoghurt Mixture
- Yoghurt – Adds a creamy base; substitute with any dairy-free or plant-based yoghurt for a delicious twist.
- Chocolate Hazelnut Spread – Provides a rich, sweet flavor; Nutella makes for a well-loved alternative.
For the Crunch
- Whole Hazelnuts – Adds a satisfying crunch and nutty flavor; feel free to swap with almonds or walnuts if you prefer.
For Dipping
- Chocolate (for dipping) – Creates a delectable outer shell; choose between dark, milk, or dairy-free chocolate to match your taste.
Step‑by‑Step Instructions for Chocolate Hazelnut Yoghurt Pops
Step 1: Mix the Base
In a large mixing bowl, combine your favourite yoghurt and chocolate hazelnut spread. Use a whisk or electric mixer to blend them together thoroughly until the mixture is smooth and creamy, which should take about 1-2 minutes. The colours should meld beautifully, creating a rich chocolate hue that tempts your taste buds.
Step 2: Add the Crunch
Once your yoghurt mixture is velvety, gently fold in the whole hazelnuts, reserving a handful for later decoration. Use a spatula to ensure even distribution without overmixing, which helps maintain the crunchy texture. This step should only take a minute or so, and the added hazelnuts will bring a delightful contrast to the creamy yogurt base.
Step 3: Fill the Moulds
With your delicious yoghurt mixture ready, carefully spoon it into popsicle moulds. Use a small spatula or your fingers to pack the mixture in tightly, ensuring no air pockets. This step is crucial for achieving the perfect texture. Then, transfer the moulds to the freezer and let them chill for at least 3 hours, or until they are solid to the touch.
Step 4: Melt the Chocolate
While the pops are freezing, prepare for dipping by melting your choice of chocolate. Use a glass or microwave-safe bowl and heat in short bursts of 15-30 seconds, stirring in between until the chocolate is completely melted and smooth. This should take about 1-2 minutes total. Remember, the melted chocolate should be warm but not too hot to burn your fingers when dipping.
Step 5: Dip the Pops
Once the yoghurt pops have set, gently remove them from their moulds by running warm water over the outside for a few seconds. Quickly, dip each pop into the melted chocolate, turning it to coat evenly. The chocolate should create a beautiful outer shell, covering all surfaces of your Chocolate Hazelnut Yoghurt Pops.
Step 6: Decorate the Pops
Before the chocolate sets, sprinkle the reserved whole and chopped hazelnuts over the dipped pops. This is where the pops get their delightful decoration and added crunch, so sprinkle generously to ensure each pop is visually appealing. Move quickly, as the warm chocolate will help adhere the toppings more effectively.
Step 7: Set the Pops
Place the decorated pops on a sheet of baking paper to catch any drips and allow them to set for about 10-15 minutes at room temperature. Once the chocolate has hardened, transfer the pops back to the freezer for a more extended chill if desired. This final step ensures they’re ready to be enjoyed at their best, with a perfect texture.

Chocolate Hazelnut Yoghurt Pops Variations
Feel free to get creative with your pops by trying out these exciting variations!
-
Dairy-Free: Swap traditional yoghurt for almond or coconut yoghurt to suit your dietary needs while adding a hint of nutty flavor.
-
Nutty Delight: Replace whole hazelnuts with crushed almonds or walnuts for a unique crunch and a new twist on taste.
-
Fruit Infusion: Mix in your favorite fresh fruits or a swirl of fruit puree in the yoghurt mixture for an extra burst of flavor and nutrition.
-
Peanut Twist: For a deliciously nutty alternative, use peanut butter instead of chocolate hazelnut spread. This adds a delightful twist to your pops!
-
Sweetener Swap: If you prefer a lighter sweetness, use agave syrup or honey in lieu of chocolate hazelnut spread while still retaining that yummy flavor.
-
Chocolate Variety: Experiment with different chocolate types for dipping, like white chocolate for a sweeter taste or dark chocolate for a richer flavor.
-
Spiced Chocolate: Add a dash of cinnamon or a pinch of cayenne pepper to the chocolate before dipping for a delightful spicy kick!
-
Layered Pops: Create layered pops by alternating layers of different flavours – try mixing strawberry yoghurt with your chocolate hazelnut mix for a stunning presentation!
These delicious variations ensure you can enjoy these Chocolate Hazelnut Yoghurt Pops in multiple exciting ways. If you’re looking for more decadent treats, don’t miss out on my White Chocolate Raspberry and Raspberry Chocolate Lasagna recipes!
Make Ahead Options
These Chocolate Hazelnut Yoghurt Pops are perfect for busy weeknights or impromptu gatherings! You can prepare the yoghurt mixture and fill the popsicle moulds up to 24 hours in advance, simply refrigerate until ready to freeze. To maintain their creamy texture, ensure the pops are tightly packed in the moulds to prevent air pockets. When you’re ready to enjoy, remove the pops from the freezer and dip them in melted chocolate as specified in the recipe. With these make-ahead tips, you’ll not only save time but also ensure that these delightful frozen treats are just as delicious as if made fresh!
Expert Tips for Chocolate Hazelnut Yoghurt Pops
-
Mix Thoroughly: Ensure the yoghurt and chocolate hazelnut spread are blended smoothly for a consistent taste. Clumps can detract from the creamy texture.
-
Nutty Decoration: Add hazelnuts right after dipping the pops in chocolate, while the chocolate is still warm. This helps them stick better and enhances the presentation.
-
Avoid Freezer Burn: Store your Chocolate Hazelnut Yoghurt Pops in an airtight container. They’ll stay fresh and delicious for up to 1-2 months, reducing ice crystals.
-
Don’t Overfreeze: Try not to freeze the pops for too long before dipping, as this can lead to ice formation. Aim for a solid freeze, around 3 hours, before dipping.
-
Creative Variations: Experiment with different yoghurt flavors or swaps, like almond or coconut yoghurt, to customize your pops according to your taste preferences.
What to Serve with Chocolate Hazelnut Yoghurt Pops
Imagine a delightful sunny afternoon, where you can savor the refreshing taste of these cool, creamy treats alongside simple yet delicious dishes that elevate your summer gatherings.
-
Fresh Fruit Salad: A vibrant mix of seasonal fruits adds a refreshing burst of flavor and balances the richness of the yoghurt pops.
-
Crunchy Granola Bars: These homemade snacks complement the creamy texture of the pops while providing an extra crunch for satisfying munching.
-
Iced Herbal Tea: A crisp, refreshing drink like hibiscus or chamomile iced tea offers a perfect pairing that cleanses the palate between bites.
-
Chilled Coconut Rice Pudding: The creamy, coconut flavor resonates beautifully with the hazelnuts, creating a tropical dessert experience.
-
Nutty Trail Mix: A mix of nuts, seeds, and dried fruits gives a satisfying crunch and enhances the nutty flavor of the pops.
-
Dark Chocolate Dipped Strawberries: These sweet treats add variety and a touch of elegance, making them a perfect accompaniment for a special gathering.
-
Homemade Lemonade: A zesty, tangy lemonade refreshes while perfectly contrasting the rich and sweet flavors of the Chocolate Hazelnut Yoghurt Pops.
-
Mini Cheesecake Bites: For those looking to impress, these little bites echo the creamy consistency of the pops and can be made gluten-free.
How to Store and Freeze Chocolate Hazelnut Yoghurt Pops
Fridge: Keep the pops in the fridge for up to 3 days if you prefer a softer texture, but they’re best enjoyed straight from the freezer.
Freezer: Store your Chocolate Hazelnut Yoghurt Pops in an airtight container to prevent freezer burn. They will remain delicious for up to 1-2 months.
Reheating: There’s no need to reheat; simply let them sit at room temperature for a few minutes before enjoying for easier eating.
Wrapping: If stacking in a container, separate layers with parchment paper to maintain their shape and avoid sticking together.

Chocolate Hazelnut Yoghurt Pops Recipe FAQs
What type of yoghurt is best for this recipe?
Absolutely! You can use any yoghurt you like, but I recommend a plain dairy-free or plant-based yoghurt for the best flavor. Greek yoghurt adds extra creaminess, while almond or coconut yoghurt can give a lovely twist to the taste.
How should I store my Chocolate Hazelnut Yoghurt Pops?
Very good question! Store them in an airtight container in your freezer to keep them fresh and free from freezer burn. They’ll last for up to 1-2 months, but do try to enjoy them sooner for the best texture and taste!
Can I freeze the Chocolate Hazelnut Yoghurt Pops?
Yes! In fact, these pops are meant to be frozen. After assembly, they need to freeze for at least 3 hours until solid. To freeze, simply place them in the popsicle molds and ensure they are tightly packed before transferring them to the freezer.
What if my pops are icy or have a grainy texture?
To avoid icy or grainy pops, be careful not to freeze them for too long before dipping them in chocolate. If they already have ice crystals, try letting them sit at room temperature for a few minutes before enjoying. This will help achieve a creamier texture.
Can pets have these Chocolate Hazelnut Yoghurt Pops?
Definitely not! While the yoghurt and hazelnuts may seem harmless, chocolate is toxic to pets, especially dogs. Please keep these treats away from your furry friends and opt for safe pet treats instead!
What if I want to customize these pops?
The more the merrier! You can customize your Chocolate Hazelnut Yoghurt Pops by swapping in different nuts, like almonds or walnuts, or even adding fresh fruit pieces into the yoghurt mixture. For a fun twist, try using peanut butter in place of chocolate hazelnut spread! The possibilities are endless!
Chocolate Hazelnut Yoghurt Pops: A Guilt-Free Delight!
Ingredients
Equipment
Method
- In a large mixing bowl, combine your favourite yoghurt and chocolate hazelnut spread until smooth and creamy.
- Gently fold in the whole hazelnuts, reserving a handful for later decoration.
- Carefully spoon the mixture into popsicle moulds, ensuring no air pockets.
- Melt your choice of chocolate in a microwave-safe bowl, stirring until smooth.
- Once set, dip each pop into the melted chocolate, coating evenly.
- Sprinkle the reserved hazelnuts over the dipped pops before the chocolate sets.
- Let the pops set on baking paper for 10-15 minutes before returning to the freezer.
Leave a Reply